Locally-configured sources
Adding a Source configuration
Locally-configured sources are configured in your config.yaml file under the sources field.
Example config
concurrency: "8"
filterUnverified: true
logLevel: info
numWorkers: 16
sources:
- connection:
    '@type': type.googleapis.com/sources.Confluence
    basicAuth:
      password: XXXXXXXXXXXXXXXXXXXXXXXXXX
      username: [email protected]
    endpoint: https://ourbusiness.atlassian.net/wiki
  name: Confluence
  scanPeriod: 12h
  type: SOURCE_TYPE_CONFLUENCE
  verify: true
trufflehogAddress: https://gnarly-flying-pancake.c1.prod.trufflehog.org
trufflehogScannerGroup: account 1 - us-west-2
trufflehogScannerToken: thog-agent-XXXXXXXXXXXXXXXXXXXXXXXXXX
Config Definitions:
ScanPeriod: (Recommended Field for Scan Frequency) This field is recommended for specifying the frequency at which each source will be scanned. It accepts human-readable strings that represent the time duration between scans. The following units are allowed:
- s: seconds
- m: minutes
- h: hours
For example:
- scanPeriod: “30s” would initiate a scan every 30 seconds.
- scanPeriod: “15m” would initiate a scan every 15 minutes.
- scanPeriod: “12h” would initiate a scan every 12 hours.
ScanInterval: (Deprecated but Supported Field for Scan Frequency) This field is deprecated but continues to be supported for backward compatibility. It specifies the frequency at which each source will be scanned, accepting only numeric values followed by a ’s’ suffix to represent seconds. For instance, scanInterval: 43200s will initiate a scan every 43,200 seconds.
RunOnce: This field determines the execution mode of the scanner. If set to true, the sources specified will be scanned only once, after which the scanner will terminate. This means that the “ScanInterval”/“ScanPeriod” value associated with each source will be ignored, and periodic scanning will not take place.
Concurrency: This value sets the number of sources that can be scanned at the same time. It essentially controls the parallelism level of the scanning process. If this value is not explicitly set, it defaults to the number of cores available on the machine running the scanner, maximizing hardware utilization.
NumWorkers: This field specifies the number of workers allocated for the detection process. Each worker is an independent unit that can process a portion of the task in parallel with other workers. If left unspecified, the default value is the number of cores present on the machine, meaning each core would have one worker assigned to it.
FilterUnverified: This field acts as a filter on the scanner’s output. If set to true, the scanner will limit its output for unverified results. Specifically, if a chunk of data yields more than one unverified result from a detector, only the first result will be included in the output. This reduces the noise in the case of multiple unverified detections. This filtering does not apply to verified results, which will be outputted normally. By reducing the volume of unverified detections reported, this setting can help focus attention on verified findings.
Artifactory (Alpha)
Artifactory with Access Token
It is recommended to generate an access token for a user with read-only
permissions. To do so, create a new user in the JFrog Artifactory UI under
“Identity and Access.” Leave all roles unchecked and ensure the user is added
to the readers group (selected by default). Once created, navigate to
the “Access Tokens” tab and generate a token for the newly created user.
sources:
- connection:
    '@type': type.googleapis.com/sources.Artifactory
    accessToken: access_token
    endpoint: https://example.jfrog.io
    repositories:
    - repo1
    - repo2
  name: Artifactory repository artifacts
  scanPeriod: 12h
  type: SOURCE_TYPE_JFROG_ARTIFACTORY
  verify: true
Artifactory with Basic Authentication
Alternatively, basic authentication can be used.
sources:
- connection:
    '@type': type.googleapis.com/sources.Artifactory
    basicAuth:
      password: secret
      username: username
    endpoint: https://example.jfrog.io
    repositories:
    - repo1
    - repo2
  name: Artifactory repository artifacts
  scanPeriod: 12h
  type: SOURCE_TYPE_JFROG_ARTIFACTORY
  verify: true
password may be one of:
- Access token
- Account password
- API key
Artifactory include/ignore lists
Artifactory sources can be configured with glob-based include and/or ignore lists. These lists can be used irrespective of the authentication method configured.
sources:
- connection:
    '@type': type.googleapis.com/sources.Artifactory
    accessToken: access_token
    endpoint: https://example.jfrog.io
    ignorePaths:
    - include-these/except-these/*
    includePaths:
    - include-these/*
    - and-these/*
  name: Artifactory repository artifacts
  scanPeriod: 12h
  type: SOURCE_TYPE_JFROG_ARTIFACTORY
  verify: true
The two lists interact as follows:
- If only an include list is provided, then TruffleHog will only scan artifacts that match it.
- If only an ignore list is provided, then TruffleHog will scan all artifacts that do not match it.
- If both lists are provided, then TruffleHog will scan only artifacts that match the include list but not the ignore list.
Azure Repos (Alpha)
Azure Repos can currently be scanned using a personal access token (PAT). To create a PAT, follow these steps:
- Go to your Azure DevOps account and click on the “User Settings” icon in the top right corner next to your profile picture.
- Click on “Personal access tokens”.
- Click on “New Token”.
- Enter a name for the token, select an organization and select the “Custom defined” option. Then, select the “Code (read)” scope. Please make sure that the “All accessible organizations” option is selected if you want to scan all repositories from all organizations.
- Click on “Create”.
When providing organizations, projects and repositories in the config, please take note of the following:
- At least one organization is required.
- Hierarchy: organizations > projects > repositories. Ensure projects are from specified organizations, and repositories are from specified projects.
- Specifying only “organizations” will result in scanning all their projects. Specifying only “projects” will scan all their repositories.
- The “ignore” filter always overrides the “include” filter, applicable to both “projects” and “repositories”.
Note: OAuth and basic authentication will be supported in the future.
sources:
- connection:
    '@type': type.googleapis.com/sources.AzureRepos
    ignoreProjects:
    - Project2
    ignoreRepos:
    - https://dev.azure.com/trufflescurity/IgnoreRepo
    includeForks: true
    organizations:
    - trufflesecurity
    projects:
    - Project1
    repositories:
    - https://dev.azure.com/trufflescurity/RepoRascal
    skipBinaries: true
    token: XXXXXXXXXXXXXXXXXXXXXXXXXX
  name: Azure Repos
  scanPeriod: 12h
  type: SOURCE_TYPE_AZURE_REPOS
  verify: true
BitBucket
You have three options depending on your BitBucket instance and the authentication method you prefer:
1. BitBucket Server with Basic Authentication
In this method, you can use an App Password or a token for authentication. Follow these steps:
sources:
- connection:
    '@type': type.googleapis.com/sources.Bitbucket
    basicAuth:
      password: XXXXXXXXXXXXXXXXXXXXXXXXXX
      username: scanner-account
    endpoint: https://bitbucket.ourbusiness.com
    ignoreRepos:
    - https://bitbucket.ourbusiness.com/linux-kernel/ignore.git
    - https://bitbucket.ourbusiness.com/torvalds/ignore2.git
    repositories:
    - https://bitbucket.ourbusiness.com/linux-kernel/linux.git
    - https://bitbucket.ourbusiness.com/torvalds/linux.git
  name: BitBucket Server
  scanPeriod: 12h
  type: SOURCE_TYPE_BITBUCKET
  verify: true
Please note:
If you use an App Password, ensure that it has Read access for both the Account and Repositories. If you use a token, it can be used in place of the password.
2. BitBucket Cloud with Personal Access Token (PAT)
For cloud-hosted BitBucket instances, you can also use a Personal Access Token (PAT). Follow these steps:
sources:
- connection:
    '@type': type.googleapis.com/sources.Bitbucket
    endpoint: https://bitbucket.org/myworkspace
    ignoreRepos:
    - https://bitbucket.ourbusiness.com/linux-kernel/ignore.git
    - https://bitbucket.ourbusiness.com/torvalds/ignore2.git
    repositories:
    - https://bitbucket.ourbusiness.com/linux-kernel/linux.git
    - https://bitbucket.ourbusiness.com/torvalds/linux.git
    skipBinaries: true
    token: ATCTTxxxxxxxxxxxxxxxxxxxxxxxxxxxxx
  name: BitBucket Cloud Token Auth
  scanPeriod: 12h
  type: SOURCE_TYPE_BITBUCKET
  verify: true
BitBucket provides three types of access tokens. Among them, we recommend using the “Workspace Access Token” as it provides access to all projects and repositories.
Please note:
If you specify both the “repositories” and “ignoreRepos” fields, the application will prioritize the “repositories” field. To avoid confusion, we recommend specifying only one of these fields.
3. BitBucket Cloud with Basic Authentication
If you’re using a cloud-hosted BitBucket instance, you can use basic authentication. Follow these steps:
sources:
- connection:
    '@type': type.googleapis.com/sources.Bitbucket
    basicAuth:
      password: XXXXXXXXXXXXXXXXXXXXXXXXXX
      username: scanner-account
    endpoint: https://bitbucket.org/myworkspace
    ignoreRepos:
    - https://bitbucket.ourbusiness.com/linux-kernel/ignore.git
    - https://bitbucket.ourbusiness.com/torvalds/ignore2.git
    repositories:
    - https://bitbucket.ourbusiness.com/linux-kernel/linux.git
    - https://bitbucket.ourbusiness.com/torvalds/linux.git
    skipBinaries: true
  name: BitBucket Cloud Basic Auth
  scanPeriod: 12h
  type: SOURCE_TYPE_BITBUCKET
  verify: true
Please note:
The password must have Read access for both the Account and Repositories. Tokens CANNOT be used in place of the password for BitBucket Cloud.
Buildkite (Beta)
Your API Access Token must have GraphQL API access enabled along with the following REST API Scopes: Organization Access, Read Artifacts, Read Builds, Read Build Logs, and Read Pipelines.
sources:
- connection:
    '@type': type.googleapis.com/sources.Buildkite
    token: XXXXXXXXXXXXXXXXXXXXXXXXXX
  name: Buildkite logs and artifacts
  scanPeriod: 12h
  type: SOURCE_TYPE_BUILDKITE
  verify: true
Confluence
Basic authentication with an email address for the username and a Confluence cloud token
for the password must be configured using basic authentication for Confluence Cloud. 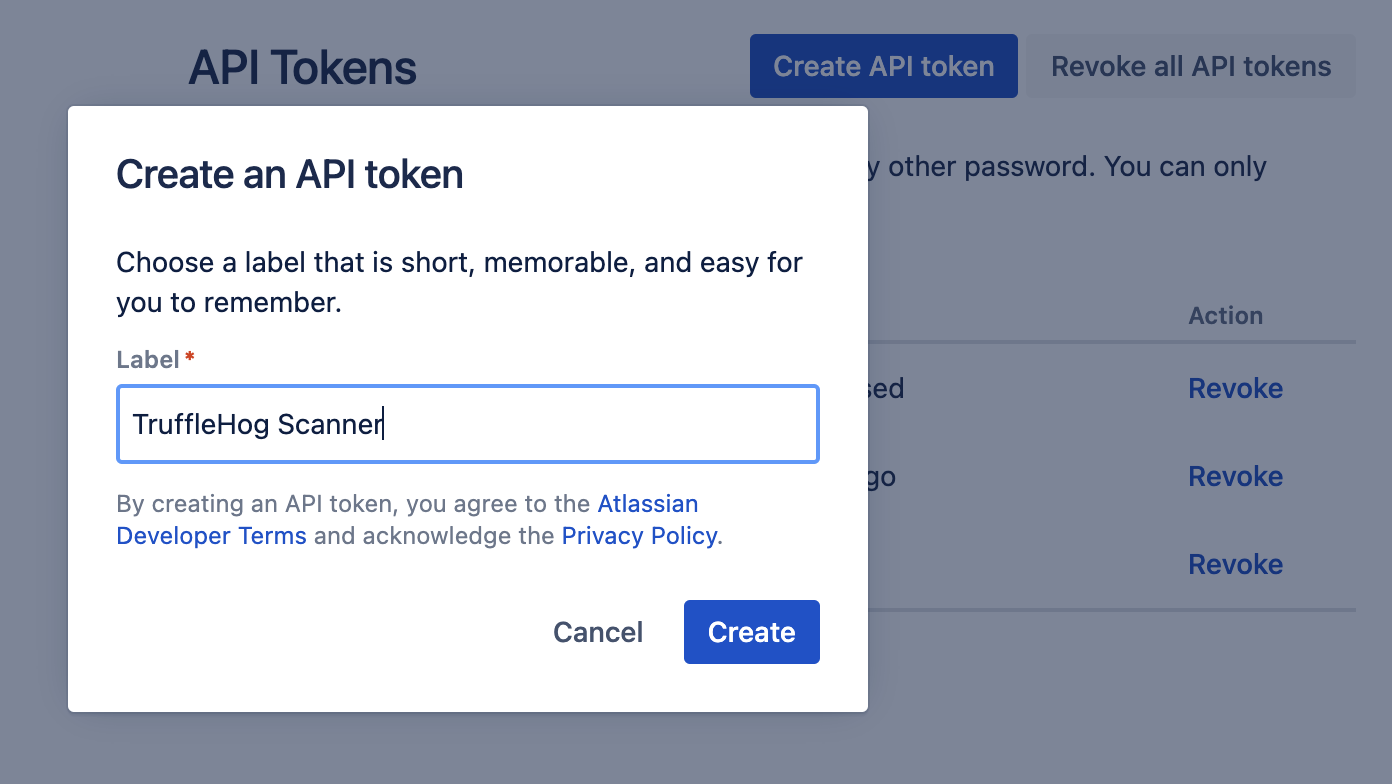
For on-premise Confluence instances, you can use a username and password with basic authentication, or you can use a personal access token (PAT) with token authentication.
A Confluence source can be configured to explicitly include and ignore certain spaces via the spaces
and ignoreSpaces configuration keys respectively. These keys expect a list of Space Names (please note
that the Space Name differs from the Space Key).
Confluence with basic authentication
sources:
- connection:
    '@type': type.googleapis.com/sources.Confluence
    basicAuth:
      password: XXXXXXXXXXXXXXXXXXXXXXXXXX
      username: [email protected]
    endpoint: https://ourbusiness.atlassian.net/wiki
    ignoreSpaces:
    - Space1
    includeAttachments: true
    skipHistory: true
    spaces:
    - Space2
    - Random-Space
  name: Confluence
  scanPeriod: 12h
  type: SOURCE_TYPE_CONFLUENCE
  verify: true
Confluence with personal access token (PAT)
sources:
- connection:
    '@type': type.googleapis.com/sources.Confluence
    endpoint: https://ourbusiness.atlassian.net/wiki
    ignoreSpaces:
    - Space2
    includeAttachments: true
    skipHistory: true
    spaces:
    - Space1
    - Random-Space
    token: XXXXXXXXXXXXXXXXXXXXXXXXXX
  name: Confluence
  scanPeriod: 12h
  type: SOURCE_TYPE_CONFLUENCE
  verify: true
Docker
The Docker integration supports using unauthenticated scans, the docker keychain (docker login), bearer token, and basic authentication. If you provide images without a tag, then latest will be assumed.
Docker with no authentication
sources:
- connection:
    '@type': type.googleapis.com/sources.Docker
    images:
    - trufflesecurity/secrets
    unauthenticated: {}
  name: Docker
  scanPeriod: 12h
  type: SOURCE_TYPE_DOCKER
  verify: true
Docker with Docker keychain authentication
sources:
- connection:
    '@type': type.googleapis.com/sources.Docker
    dockerKeychain: true
    images:
    - trufflesecurity/secrets
  name: Docker
  scanPeriod: 12h
  type: SOURCE_TYPE_DOCKER
  verify: true
Docker with basic authentication
sources:
- connection:
    '@type': type.googleapis.com/sources.Docker
    basicAuth:
      password: XXXXXXXXXXXXXXXXXXXXXXXXXX
      username: user
    images:
    - trufflesecurity/secrets
  name: Docker
  scanPeriod: 12h
  type: SOURCE_TYPE_DOCKER
  verify: true
Docker with bearer token authentication
sources:
- connection:
    '@type': type.googleapis.com/sources.Docker
    bearerToken: token-value
    images:
    - trufflesecurity/secrets
  name: Docker
  scanPeriod: 12h
  type: SOURCE_TYPE_DOCKER
  verify: true
Filesystem
Configure the filesystem source by specifying the paths field to define paths for scanning.
The directories field is deprecated but still supported for backward compatibility;
however, its use is discouraged in new configurations.
Include and Exclude Paths
Control the scope of the scan with includePathsFile and excludePathsFile.
These fields should reference files containing newline-separated regular expressions.
Files matching these expressions will be included or excluded from the scan, respectively.
includePathsFile:Path to a file with newline-separated regex patterns. Files matching these patterns are included in the scan.excludePathsFile:Path to a file with newline-separated regex patterns. Files matching these patterns are excluded from the scan.
sources:
- connection:
    '@type': type.googleapis.com/sources.Filesystem
    directories:
    - /home/me/dev
    excludePathsFile: /home/me/dev/exclude.txt
    includePathsFile: /home/me/dev/include.txt
    paths:
    - /home/me/dev
  name: Filesystem
  scanPeriod: 12h
  type: SOURCE_TYPE_FILESYSTEM
  verify: true
File and Stdin
Help
$ trufflehog file --help
usage: TruffleHog file [<flags>] [<path>]

Scan a file (defaults to standard in)

Flags:
      --help                  Show context-sensitive help (also try --help-long and --help-man).
  -v, --debug                 Enable debug mode.
      --trace                 Enable tracing of code line numbers.
      --json                  Enable JSON output.
      --send-error-telemetry  Turns error telemetry off.
      --quiet                 Only show results.

Args:
  [<path>]  Path of the file to scan
Example
You will need to obtain credentials to run this. You can get them by creating a scanner group (on your isolated instance go to settings -> scanners) and downloading the config.
Tip: run with --no-update if doing frequent invocations to cut down on startup time by ignoring updates
#  3 different ways you can invoke stdin and file scanner

./trufflehog file --config config.yaml --json /etc/passwd

cat /etc/password | ./trufflehog file --config config.yaml --json

./trufflehog file --config config.yaml --json < /etc/password
When using Docker, you must include the --interactive or -i flag (but not -t or --tty) for Docker to past the stdin to TruffleHog:
docker run --net=host --restart=unless-stopped -v $(pwd)/config.yaml:/tmp/config.yaml -i us-docker.pkg.dev/thog-artifacts/public/scanner:latest file --config=/tmp/config.yaml
GCS (Google Cloud Storage)
ProjectID is required. If you omit providing buckets then all buckets that the credential can list and access will be scanned.
When using the include/exclude filters for both buckets and objects, the include filters take precedence if both are specified. It is recommended to only use one of the two filters for each.
GCS with GCP IAM credentials (recommended)
Example IAM policy:
{
  "version": "1",
  "bindings": [
    {
      "role": "roles/storage.objectViewer",
      "members": [
        "user:<user_email>"
      ]
    },
    {
      "role": "roles/viewer",
      "members": [
        "user:<user_email>"
      ]
    }
  ]
}
Configuration:
sources:
- connection:
    '@type': type.googleapis.com/sources.GCS
    adc: {}
    excludeBuckets:
    - bucket3
    excludeObjects:
    - object3
    includeBuckets:
    - bucket1
    - bucket2
    includeObjects:
    - object1
    - object2
    projectId: my-project (REQUIRED)
  name: GCS
  scanPeriod: 12h
  type: SOURCE_TYPE_GCS
  verify: true
GCS with service account file. (JSON)
Example IAM policy:
{
  "version": "1",
  "bindings": [
    {
      "role": "roles/storage.objectViewer",
      "members": [
        "user:<user_email>"
      ]
    },
    {
      "role": "roles/viewer",
      "members": [
        "user:<user_email>"
      ]
    }
  ]
}
Configuration:
sources:
- connection:
    '@type': type.googleapis.com/sources.GCS
    excludeBuckets:
    - bucket3
    excludeObjects:
    - object3
    includeBuckets:
    - bucket1
    - bucket2
    includeObjects:
    - object1
    - object2
    projectId: my-project (REQUIRED)
    serviceAccountFile: /path/to/service-account.json
  name: GCS
  scanPeriod: 12h
  type: SOURCE_TYPE_GCS
  verify: true
GCS without authentication.
Can only be used for public buckets.
Configuration:
sources:
- connection:
    '@type': type.googleapis.com/sources.GCS
    excludeObjects:
    - object3
    includeBuckets:
    - bucket1
    - bucket2
    includeObjects:
    - object1
    - object2
    unauthenticated: {}
  name: GCS
  scanPeriod: 12h
  type: SOURCE_TYPE_GCS
  verify: true
Gerrit
If you omit providing projects then all code projects that the credential can list and access will be scanned.
sources:
- connection:
    '@type': type.googleapis.com/sources.Gerrit
    basicAuth:
      password: XXXXXXXXXXXXXXXXXXXXXXXXXX
      username: scanner-account
    endpoint: https://gerrit.example.com
  name: Gerrit
  scanPeriod: 12h
  type: SOURCE_TYPE_GERRIT
  verify: true
Git
The Git source expects a list repository URIs and/or a list of local directories with repositories to scan.
Include and Exclude Paths
Control the scope of the scan with includePathsFile and excludePathsFile.
These fields should reference files containing newline-separated regular expressions.
Files matching these expressions will be included or excluded from the scan, respectively.
Unauthenticated
sources:
- connection:
    '@type': type.googleapis.com/sources.Git
    directories:
    - /home/me/dev/vscode
    excludePathsFile: /home/me/dev/exclude.txt
    includePathsFile: /home/me/dev/include.txt
    repositories:
    - https://github.com/dustin-decker/secretsandstuff.git
    unauthenticated: {}
  name: Git
  scanPeriod: 12h
  type: SOURCE_TYPE_GIT
  verify: true
Basic Auth
sources:
- connection:
    '@type': type.googleapis.com/sources.Git
    basicAuth:
      password: clonePassword
      username: cloneUser
    excludePathsFile: /home/me/dev/exclude.txt
    includePathsFile: /home/me/dev/include.txt
    repositories:
    - https://github.com/dustin-decker/secretsandstuff.git
    skipBinaries: true
  name: Git
  scanPeriod: 12h
  type: SOURCE_TYPE_GIT
  verify: true
SSH Auth
sources:
- connection:
    '@type': type.googleapis.com/sources.Git
    excludePathsFile: /home/me/dev/exclude.txt
    includePathsFile: /home/me/dev/include.txt
    repositories:
    - ssh://github.com/dustin-decker/secretsandstuff.git
    skipBinaries: true
    sshAuth: {}
  name: Git
  scanPeriod: 12h
  type: SOURCE_TYPE_GIT
  verify: true
GitHub
Personal Access Tokens should be created with the following scopes: repo, gist, and read:org
sources:
- connection:
    '@type': type.googleapis.com/sources.GitHub
    endpoint: https://github.ourbusiness.com
    ignoreRepos:
    - trufflesecurity/trufflehog
    - torvalds/linux
    includeForks: true
    includeGistComments: true
    includeIssueComments: true
    includePullRequestComments: true
    organizations:
    - trufflesecurity
    repositories:
    - https://github.ourbusiness.com/torvalds/linux.git
    scanUsers: true
    skipBinaries: true
    token: XXXXXXXXXXXXXXXXXXXXXXXXXX
  name: GitHub
  scanPeriod: 12h
  type: SOURCE_TYPE_GITHUB
  verify: true
GitLab
A GitLab source can be configured to explicitly scan a list of repository URLs
via the repositories configuration key. You may omit
or leave repositories empty to have TruffleHog
automatically enumerate repositories during a scan.
When enumerating, the ignoreRepos field may be
configured with a list of globs to exclude matching repositories from the scan,
in the form namespace/repository. See below for
examples. If both repositories and
ignoreRepos are present, only
repositories is used.
Token Auth
The GitLab token should be created with the read_api scope.
sources:
- connection:
    '@type': type.googleapis.com/sources.GitLab
    endpoint: https://gitlab.ourbusiness.com
    skipBinaries: true
    token: XXXXXXXXXXXXXXXXXXXXXXXXXX
  name: GitLab
  scanPeriod: 12h
  type: SOURCE_TYPE_GITLAB
  verify: true
Basic Auth
sources:
- connection:
    '@type': type.googleapis.com/sources.GitLab
    basicAuth:
      password: t0ken
      username: svc-user
    endpoint: https://gitlab.ourbusiness.com
    ignoreRepos:
    - trufflesecurity/trufflehog
    - torvalds/linux
    skipBinaries: true
  name: GitLab
  scanPeriod: 12h
  type: SOURCE_TYPE_GITLAB
  verify: true
Google Drive (Beta)
The Google Drive scanner is now available under “Integrations” in the webapp. To access, click on Integrations > Add integration > Source > Google Drive.
Currently, each integration can only be configured to scan a single google drive account. If you want to scan multiple google drives, you will need to create separate integrations. However, we plan to enhance this capability in the future, allowing multiple drives across an organization to be scanned from a single integration.
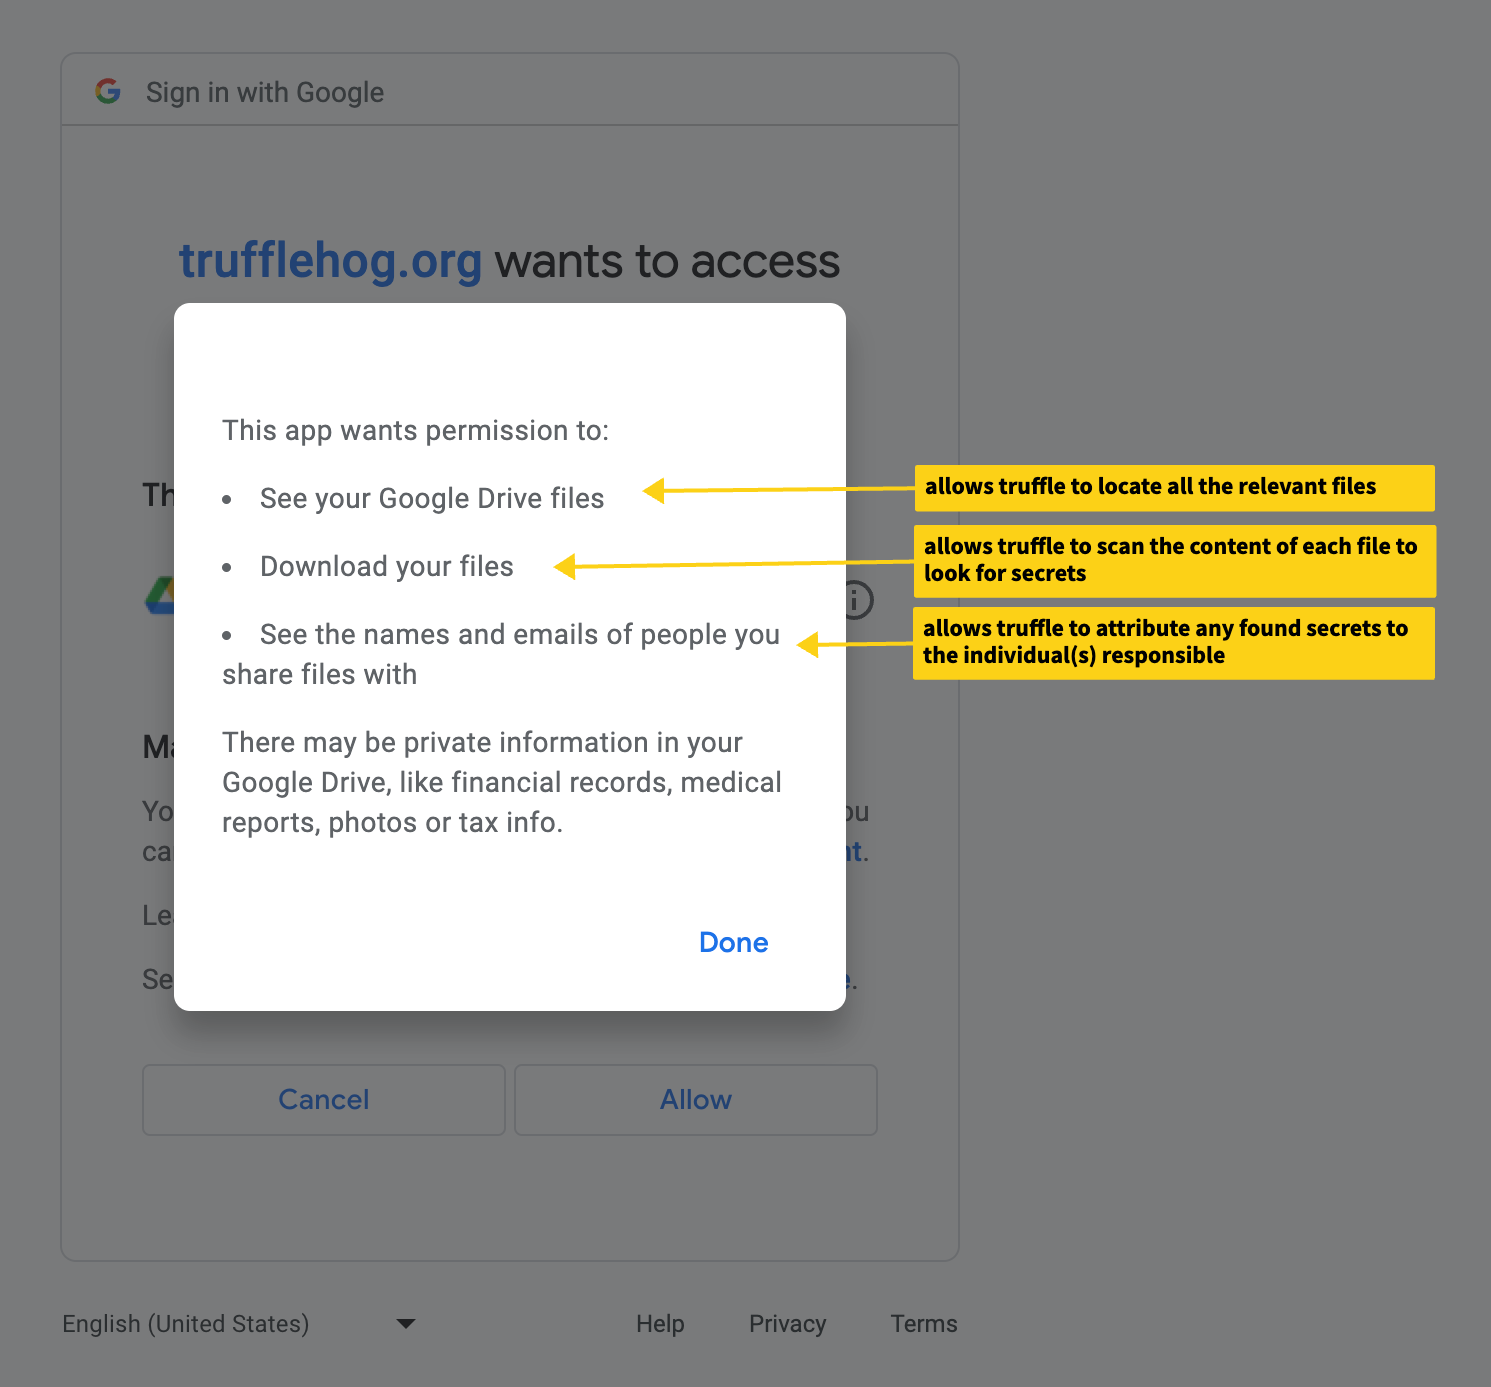
During the initial setup of the Google Drive integration, you will need to sign in with the account to be scanned and grant the web app the https://www.googleapis.com/auth/drive.readonly permission.
This scope allows Truffle to search what files are available via Google Drive to the account, download the files to perform
scanning for secrets (all files are downloaded and scanned in-memory and no content is stored), and see the names and emails of individuals associated with those files in order
to make attributions in the event secrets are found.
Please note: Our current version will only scan files accessible by the account used to create the integration. This means files owned-by the account and files shared-with the account with the “Viewers and commenters can see the option to download, print, and copy” option set (usually ON by default in the file sharing settings).
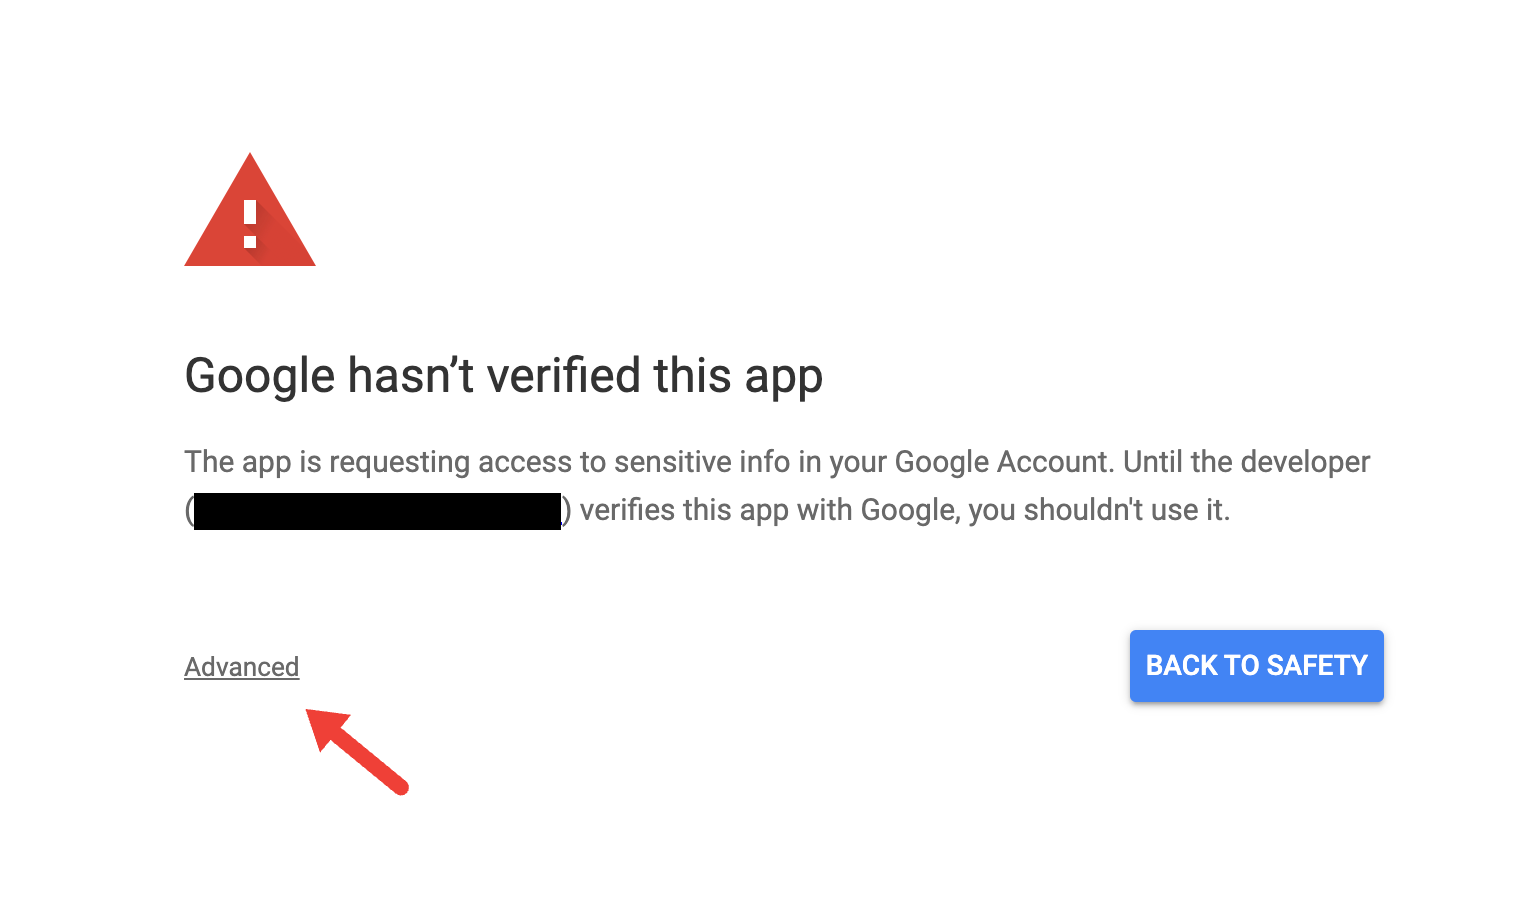
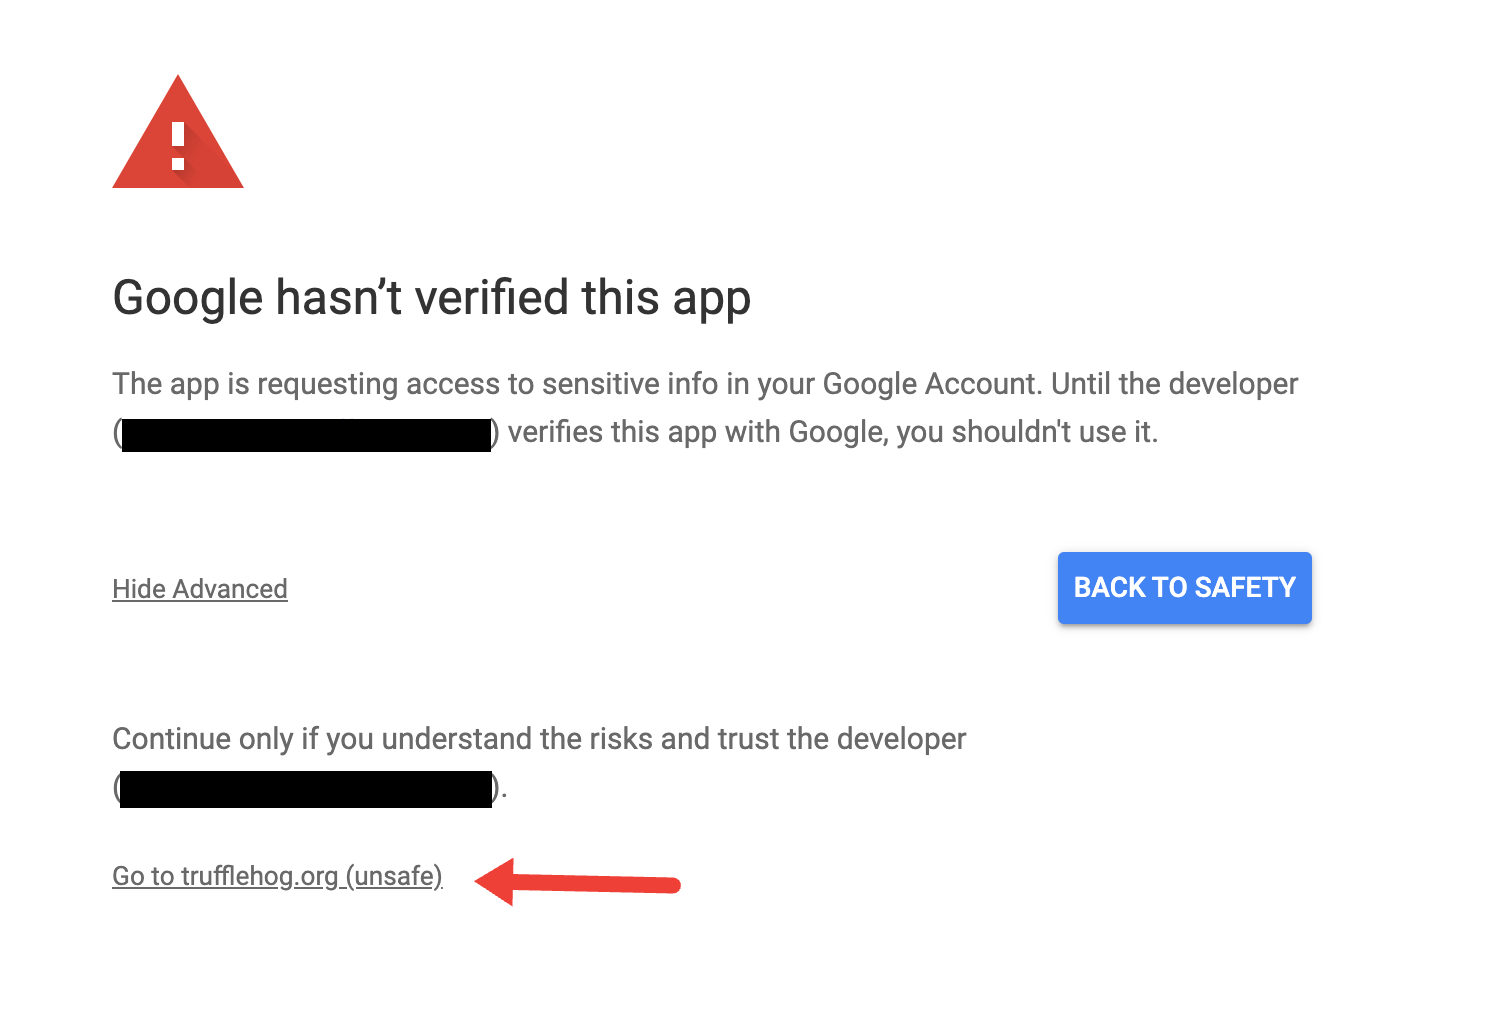
If your administrator has not whitelisted Truffle’s app, you will most likely come across a screen with the following message “Google hasn’t verified this app”. You will then need to click through Advanced > Go to TruffleHog.org (unsafe) which will lead to the page for accepting permissions.
Note: If you are an admin, we have added instructions below on how to whitelist the Truffle webapp.
Once you have allowed Truffle access, you will be redirected back to the configuration screen. Please name your integration and set the duration between scans - by default they are set at 12 hour intervals.
[For Admins] How to whitelist Truffle webapp (optional):
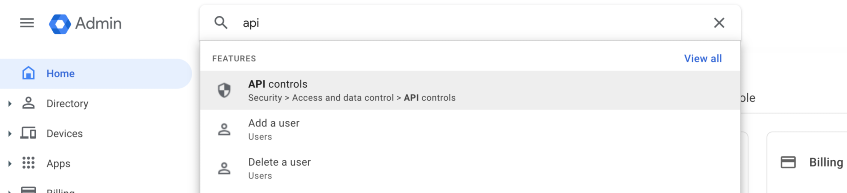
Go to the Google Admin Panel and search for “API Controls”. It should appear under Security > Access and data control > API controls
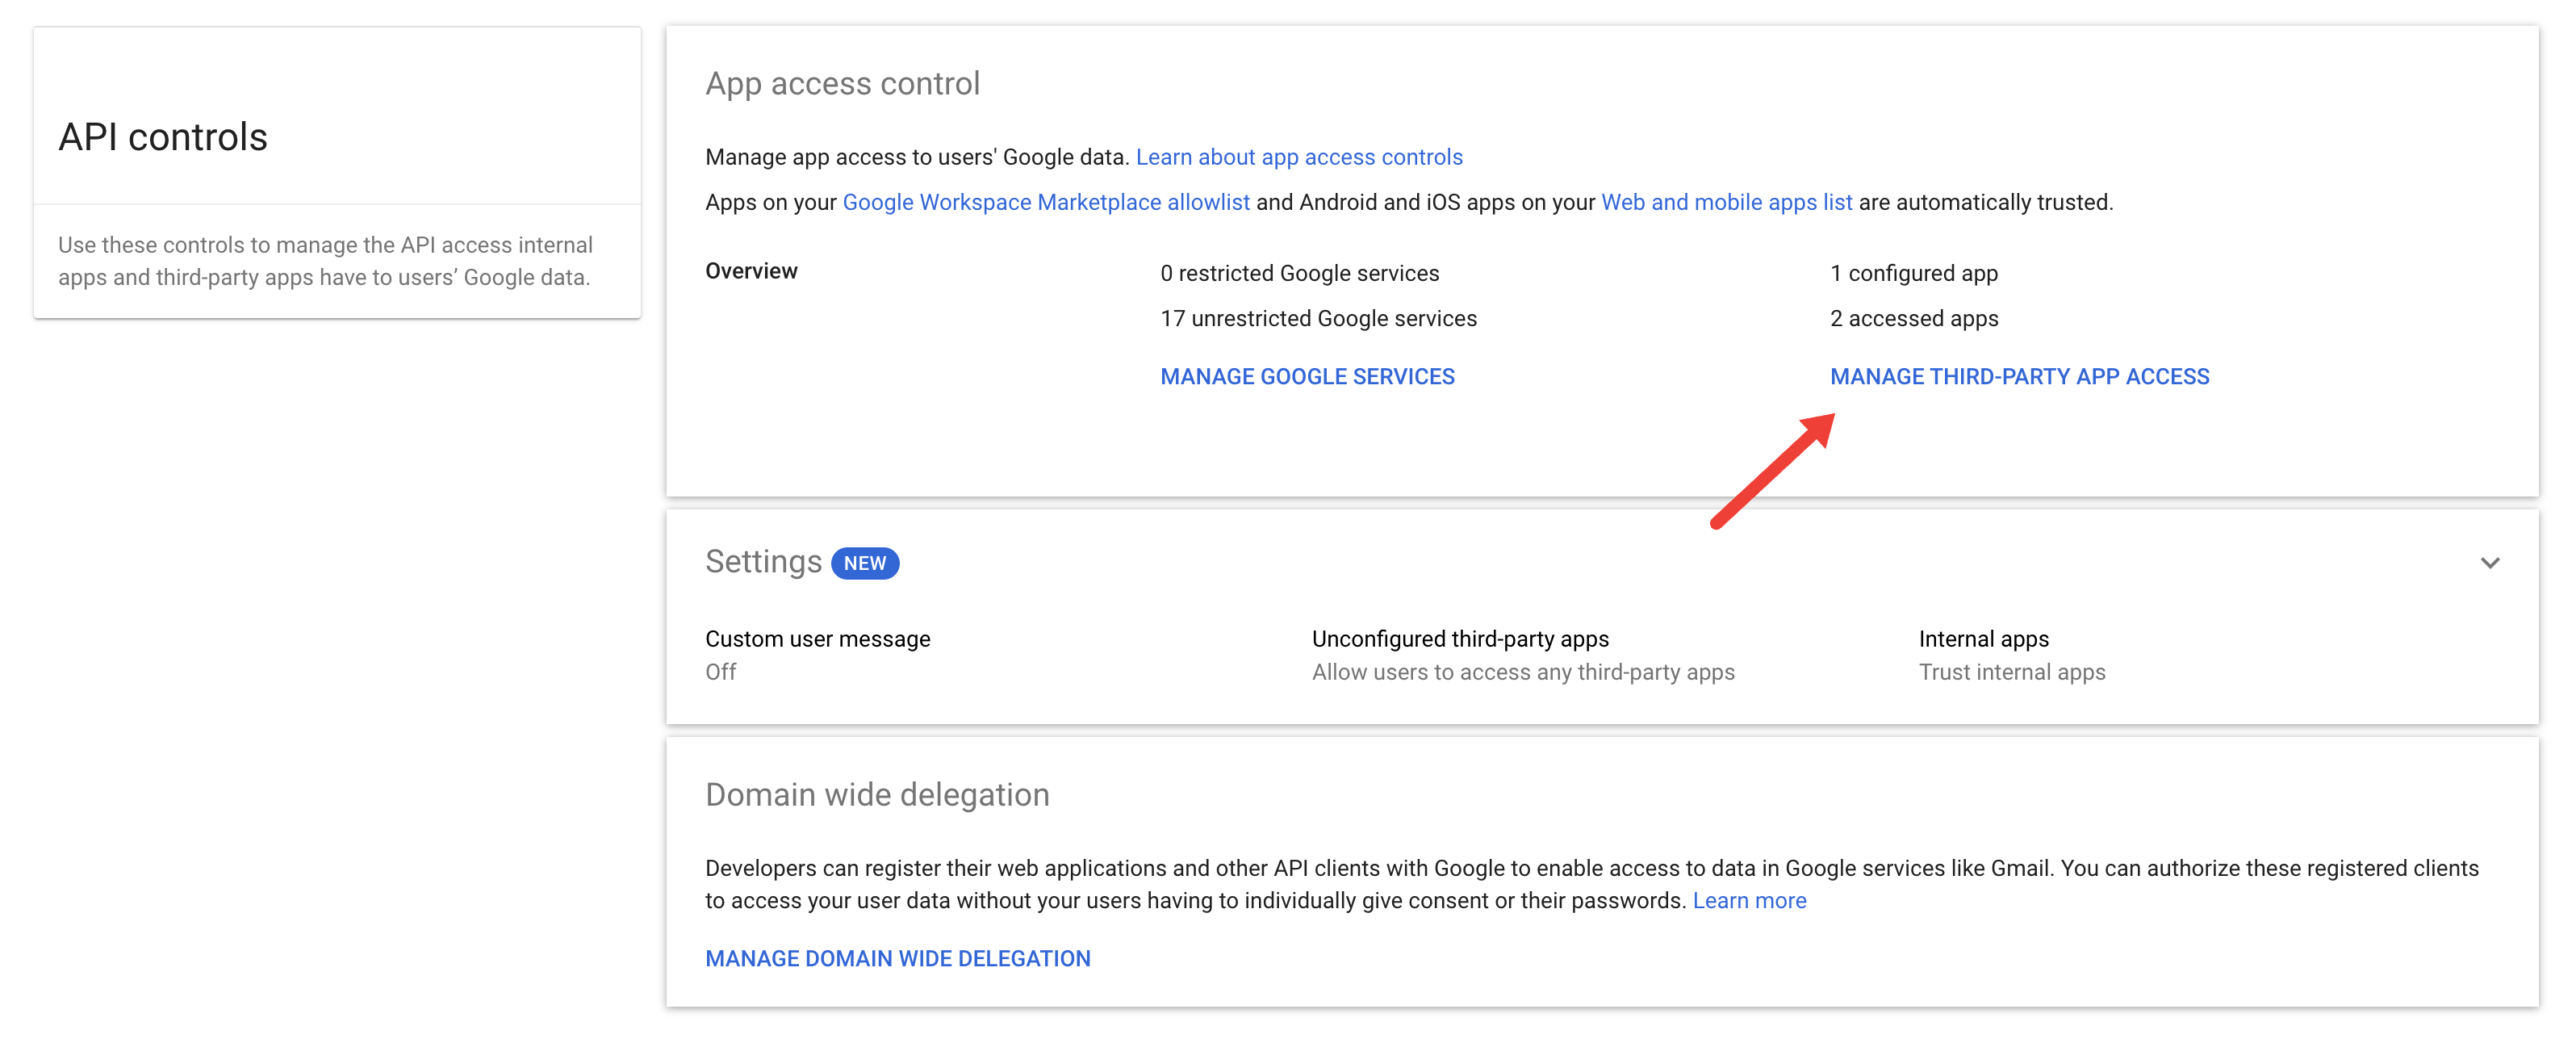
Then go to MANAGE THIRD-PARTY APP ACCESS
If you have added the Truffle integration once while unverified, the app should appear on the list with “Access” set to “Not Configured”.
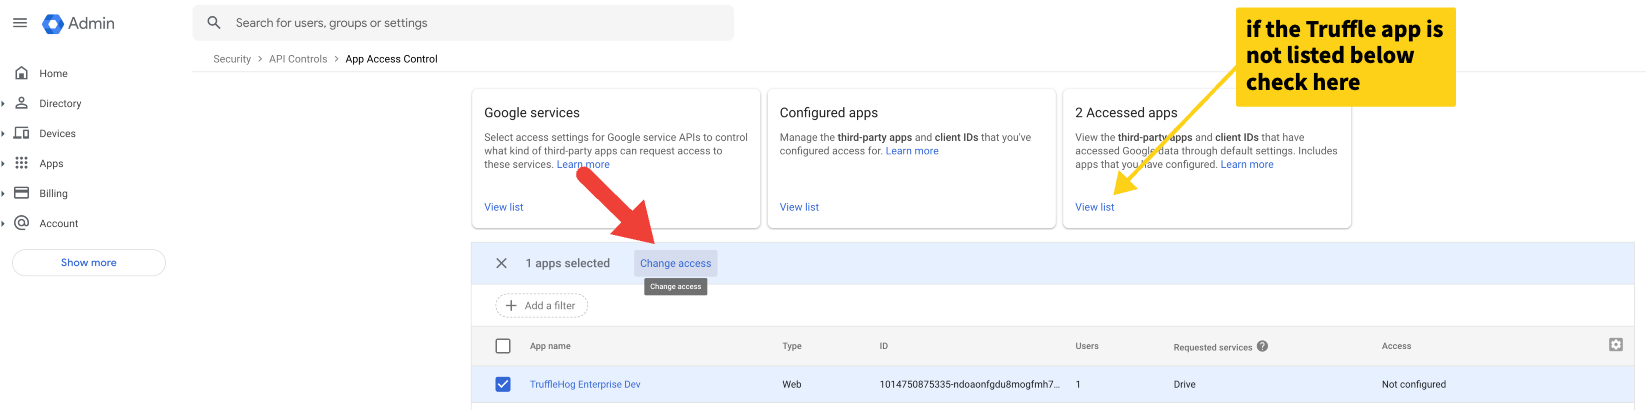 Check the box next to the Truffle App and click “Change access”
Note: If it does not appear on the list, check “View list” under “Accessed Apps”. If you have not run the app once while unverified, that may also be required for it to appear.
Under Scope, click “Include organizational units” and add the origanizational units for whom you would like the app to be whitelisted. And click SELECT.
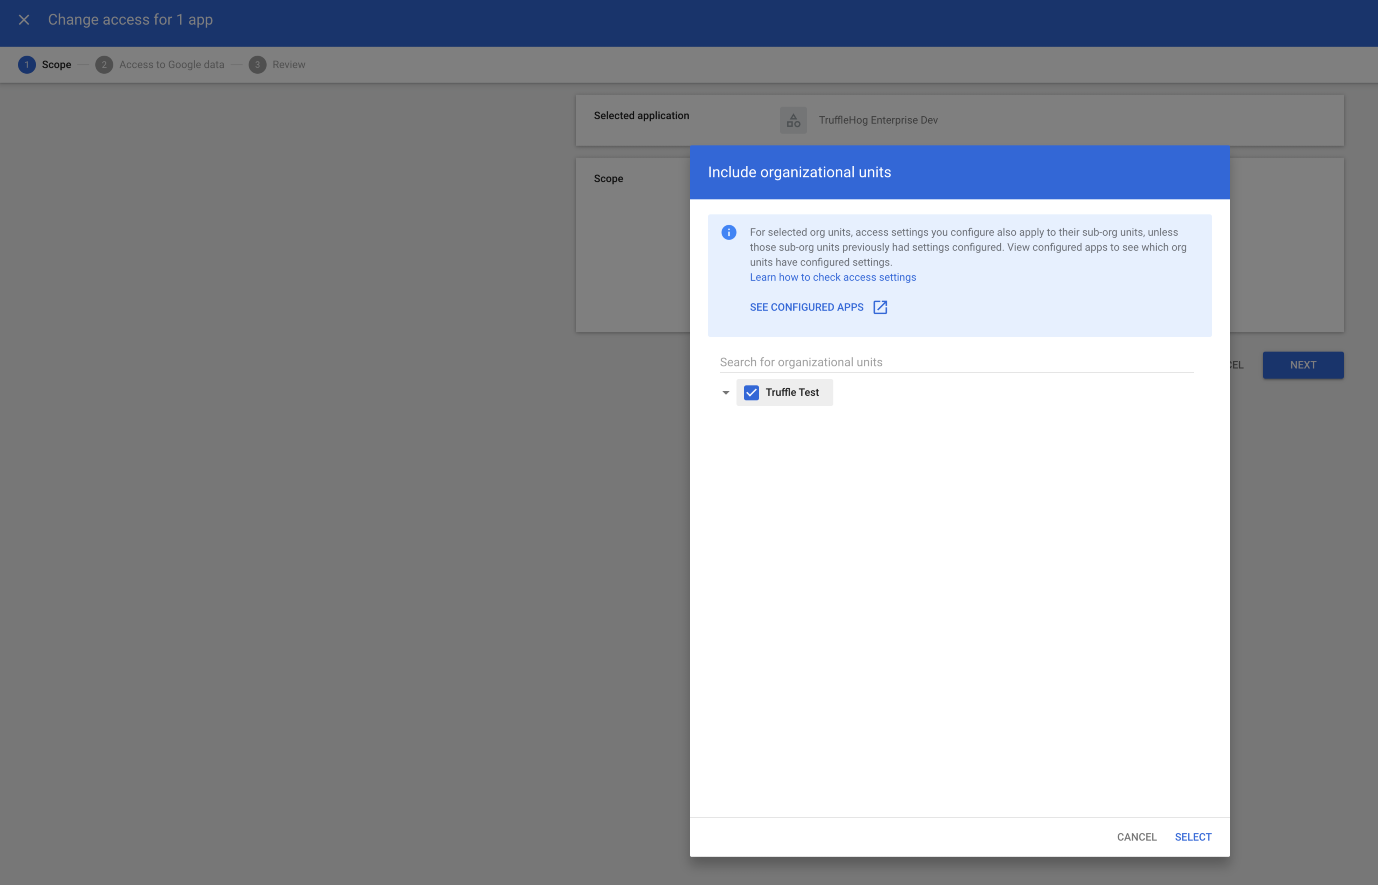
Under “Access to Google Data” select “Trusted” and click NEXT.
Once you’ve reviewed the changes, click CHANGE ACCESS.
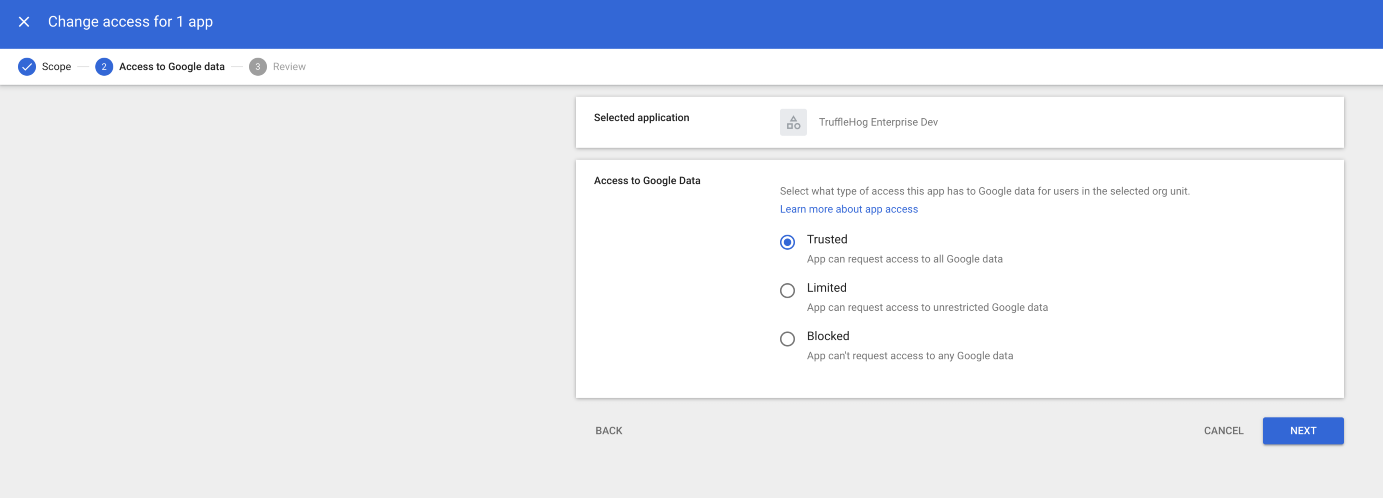
You should now be all set, and the app should no longer prompt the “Unverified” screen during integration setup.
Jenkins
sources:
- connection:
    '@type': type.googleapis.com/sources.Jenkins
    basicAuth:
      password: XXXXXXXXXXXXXXXXXXXXXXXXXX
      username: scanner-account
    endpoint: https://jenkins.example.com
  name: Jenkins logs and artifacts
  scanPeriod: 12h
  type: SOURCE_TYPE_JENKINS
  verify: true
JIRA
Basic authentication with an email address for the username and a JIRA cloud token
for the password must be configured using basic authentication for JIRA Cloud.
For on-premise JIRA instances, you can use a username and password with basic authentication, or you can use a personal access token (PAT) with token authentication.
If you omit providing projects then all projects that the credential can list and access will be scanned.
JIRA with basic authentication
sources:
- connection:
    '@type': type.googleapis.com/sources.JIRA
    basicAuth:
      password: XXXXXXXXXXXXXXXXXXXXXXXXXX
      username: [email protected]
    endpoint: https://ourbusiness.atlassian.net
    projects:
    - ENG
    - ITSYS
  name: JIRA
  scanPeriod: 12h
  type: SOURCE_TYPE_JIRA
  verify: true
JIRA with personal access token (PAT)
sources:
- connection:
    '@type': type.googleapis.com/sources.JIRA
    endpoint: https://ourbusiness.atlassian.net
    projects:
    - ENG
    - ITSYS
    token: XXXXXXXXXXXXXXXXXXXXXXXXXX
  name: JIRA
  scanPeriod: 12h
  type: SOURCE_TYPE_JIRA
  verify: true
Microsoft Teams
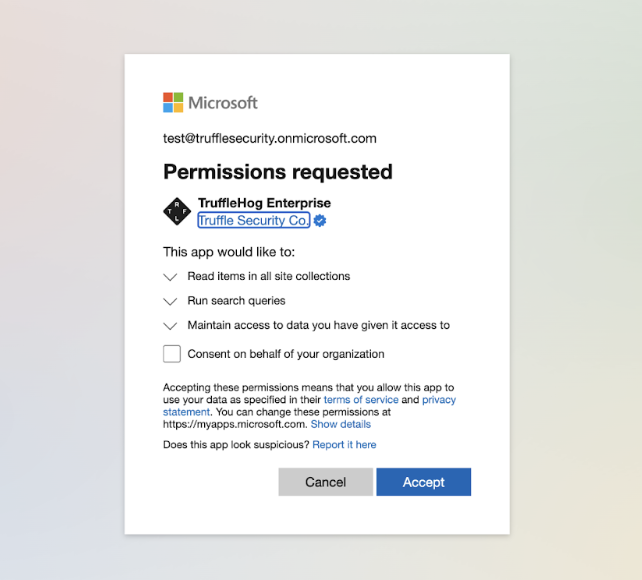
During the initial setup of the Teams integration, an admin account will need to provide permission as part of the OAuth2 flow.
To enable the necessary functionality in the Teams integration, the following scopes are required:
- ChannelMessage.Read.All: This scope allows Trufflhog to access and read messages in all public and private channels within the Teams workspace, unless specific include/exclude filters are applied during the setup process. Please note that scanning direct messages is currently not supported.
Currently, each integration can only be configured to scan a single team. If you want to scan multiple teams, you will need to create separate integrations. However, we plan to enhance this capability in the future, allowing multiple teams to be scanned from a single integration.
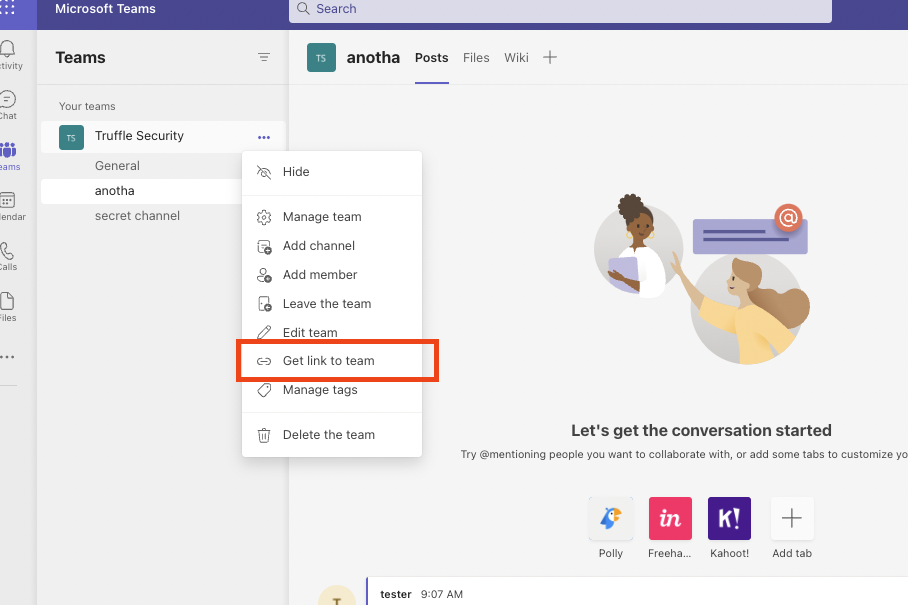
When configuring the Teams scanner from the UI Dashboard the Team ID is referencing your Microsoft Teams ID number. This can be found by going into your Teams app in the lefthand pane, click the … button next to the team, and click “Get link to team”. Please be sure the menu is for the team and not for a channel.
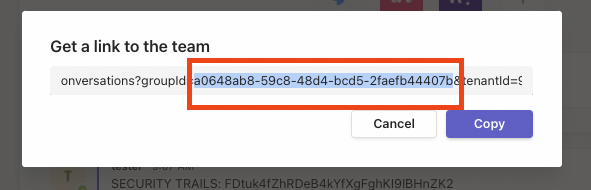
The Team ID will come right after groupId in the link provided. (ex. xxxgroupId=&tenantId=xxx).
The Teams integration requires the web UI in order to successfully scan sources. (Local config will be made available in the near future with the use of Client Credentials or Oauth2.)
Microsoft SharePoint (Alpha)
During the initial setup of the SharePoint integration, an admin account will need to provide permission as part of the OAuth2 flow.
To enable the necessary functionality in the SharePoint integration, the following scopes are required:
- AllSites.Read: This scope allows the scanner to access and read all sites within your SharePoint workspace.
- Sites.Search.All: This scope allows the scanner to navigate through all the contents within your SharePoint workspace.
- offline_access: This scope allows TruffleHog Enterprise to maintain the state of the secrets detected by the scanner.
When configuring the SharePoint scanner from the UI, the Site URL is referencing your Microsoft SharePoint site.
- Log into SharePoint
- Click into a SharePoint site
- From the URL in the address bar, copy over only the portion up to (and including)
.com. Example https://trufflesecurity.sharepoint.com/
The SharePoint integration requires the web UI in order to successfully scan sources. (Local config will be made available in the near future with the use of Client Credentials or Oauth2.)
Slack
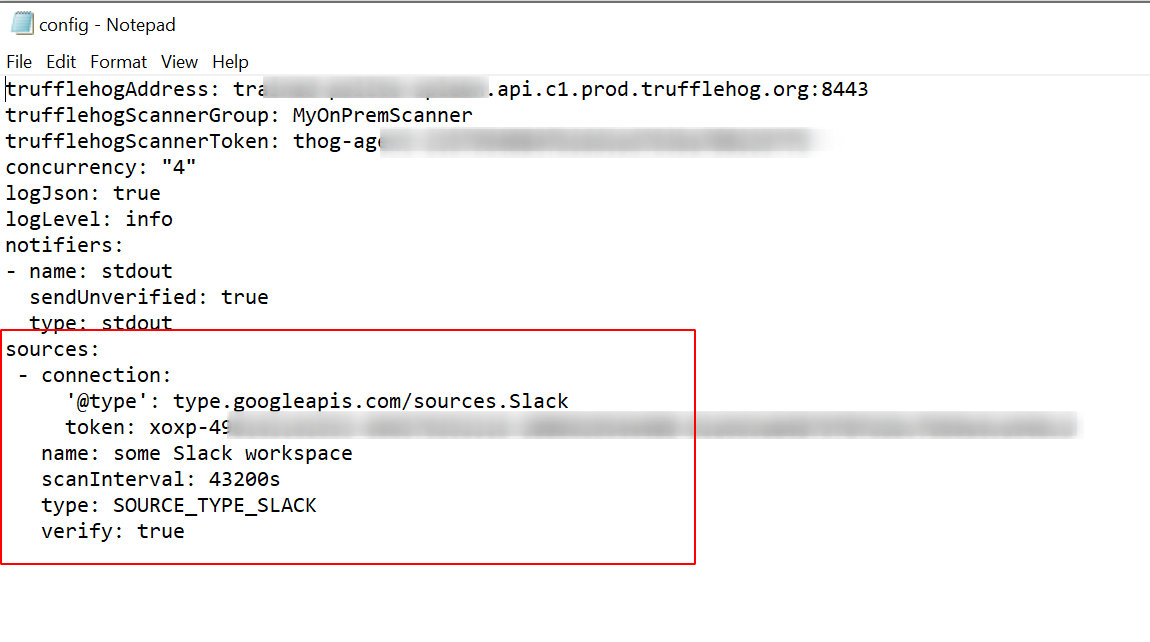
sources:
- connection:
    '@type': type.googleapis.com/sources.Slack
    channels:
    - General
    - Random
    endpoint: https://mybusiness.slack.com
    ignoreList:
    - General
    token: XXXXXXXXXXXXXXXXXXXXXXXXXX
  name: Slack
  scanPeriod: 12h
  type: SOURCE_TYPE_SLACK
  verify: true
Single Workspace App
If you are able, we recommend using the Slack install from the UI because not only is it much easier, but it also scans faster because it has higher rate limits.
You may create your own single workspace Slack app to utilize with TruffleHog and provide the refresh token in the token field in the example above. Below are the steps to create the app.
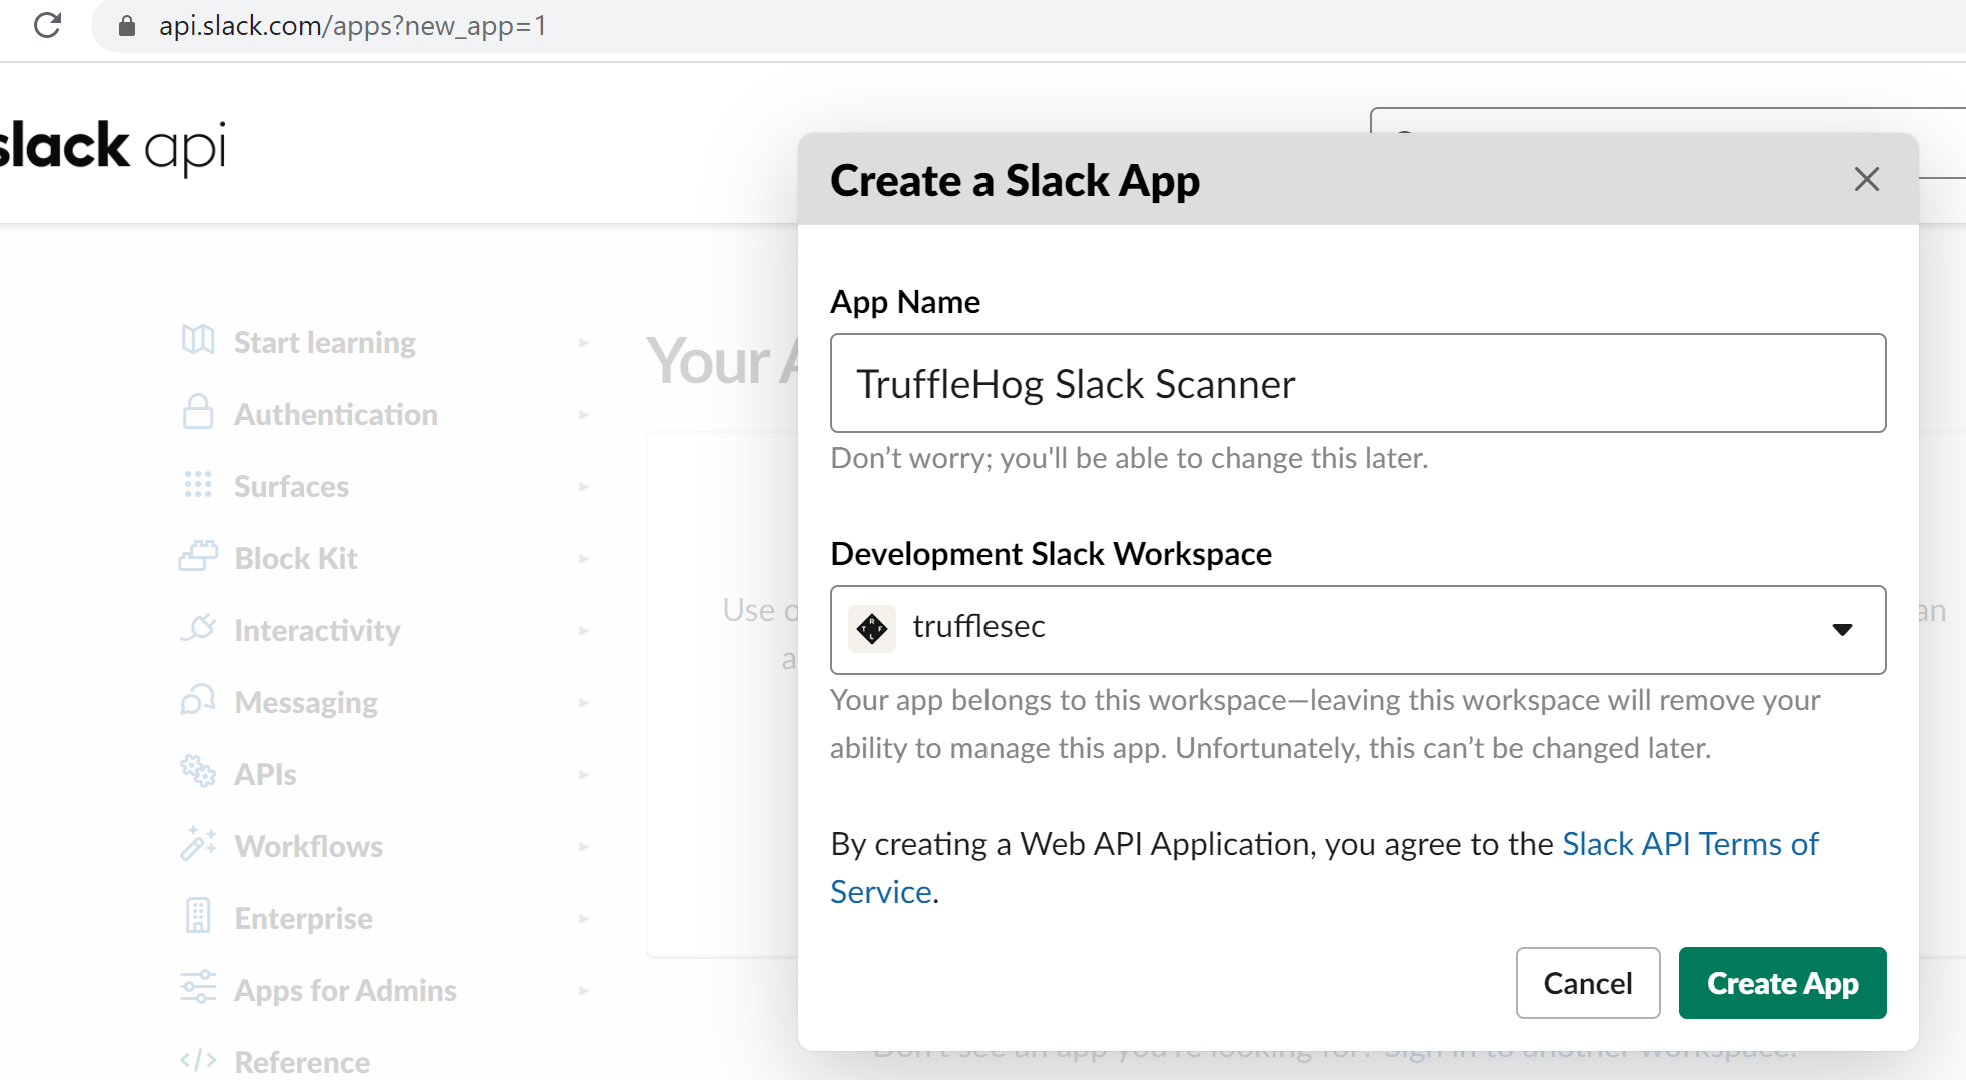
Start creating the app here
Give the app a name a choose the workspace you want to TruffleHog to operate on. (You will need seperate apps to utilize a multiple workspaces)
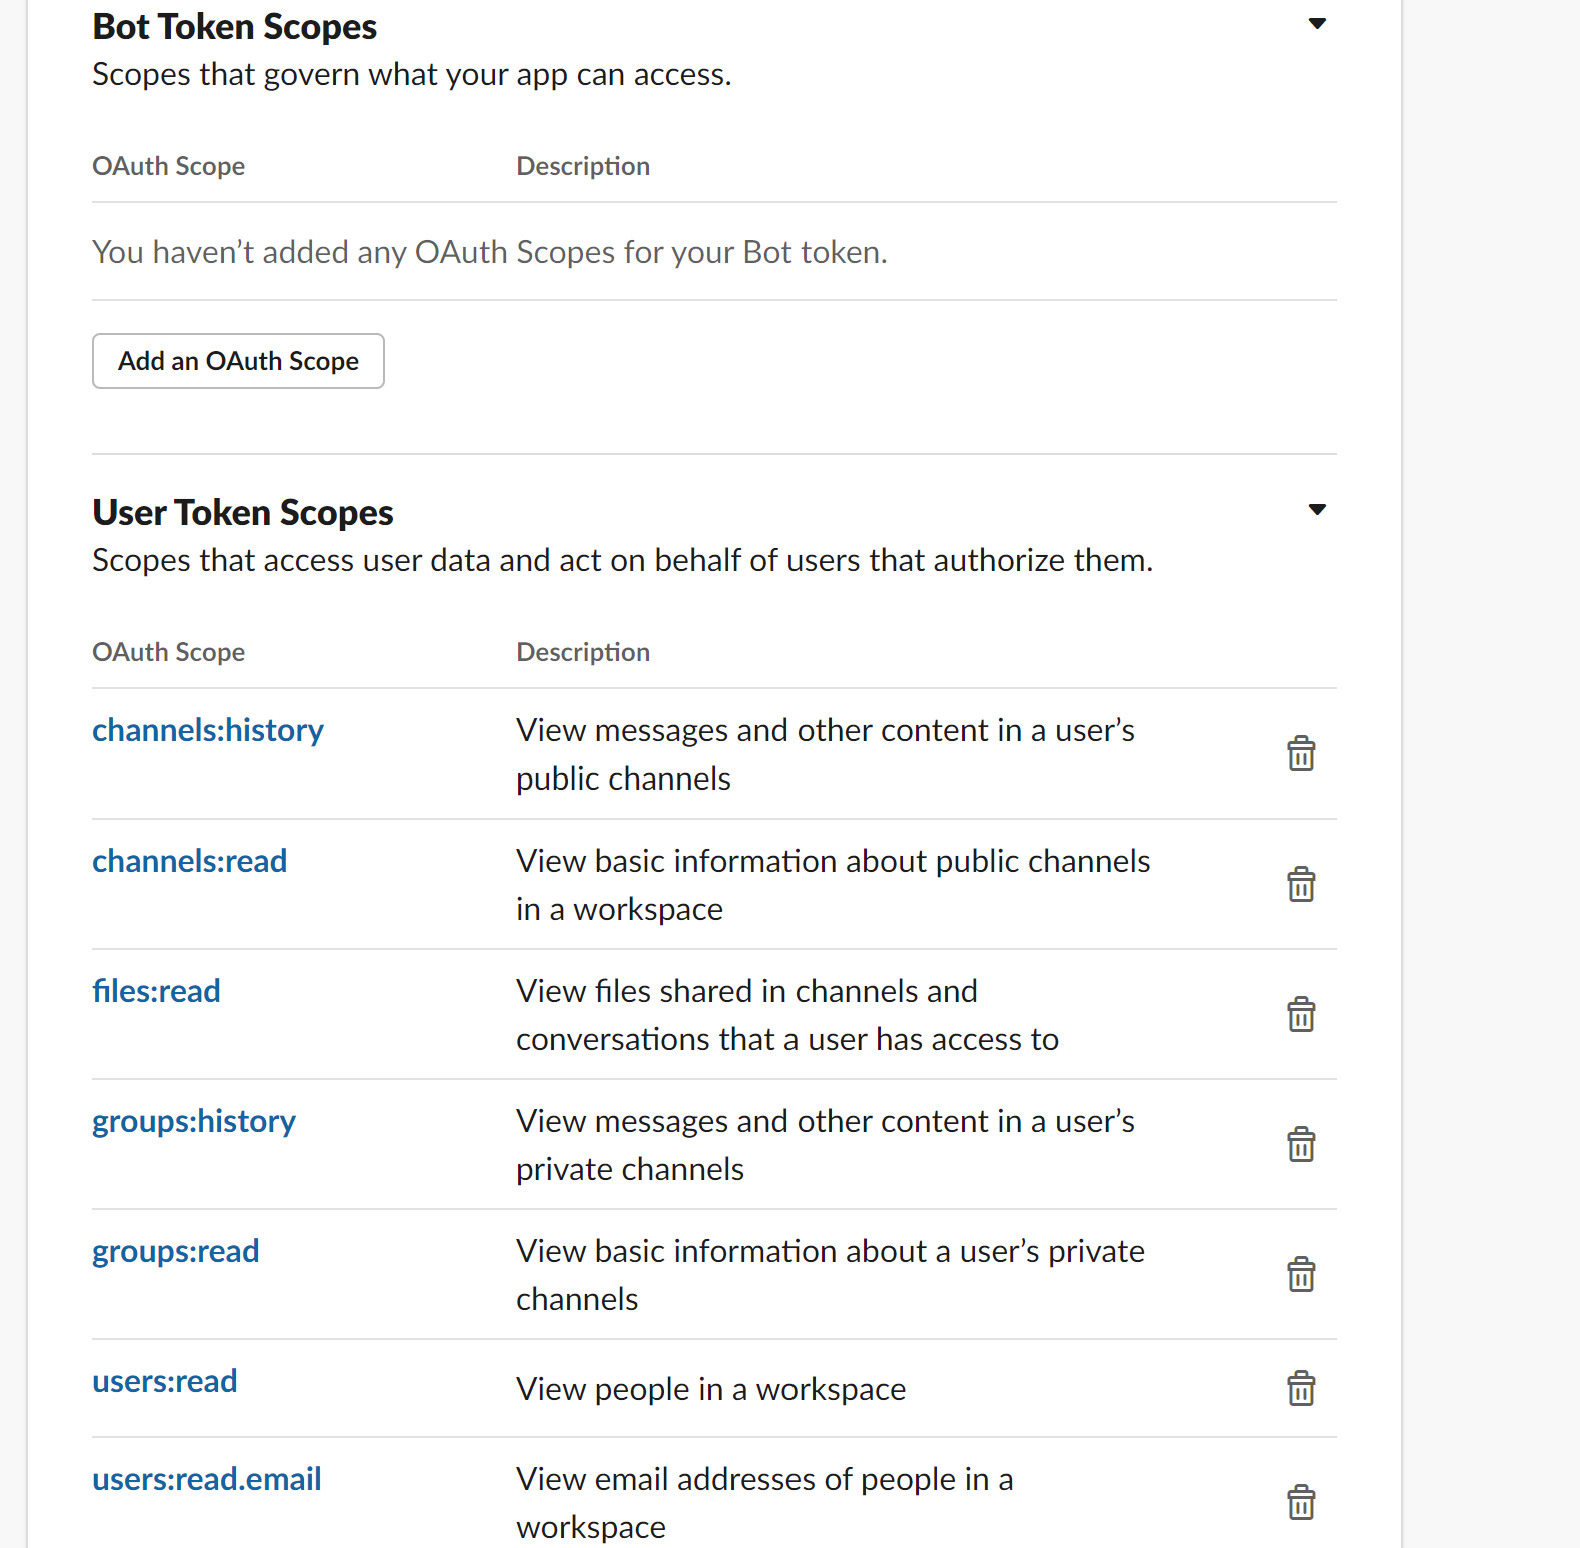
- Update the “User Token Scopes” section with the following scopes:
- users:read
- users:read.email
- channels:history
- channels:read
- groups:history
- groups:read
- files:read
- Make sure everything is saved and looks correct, then install your app!
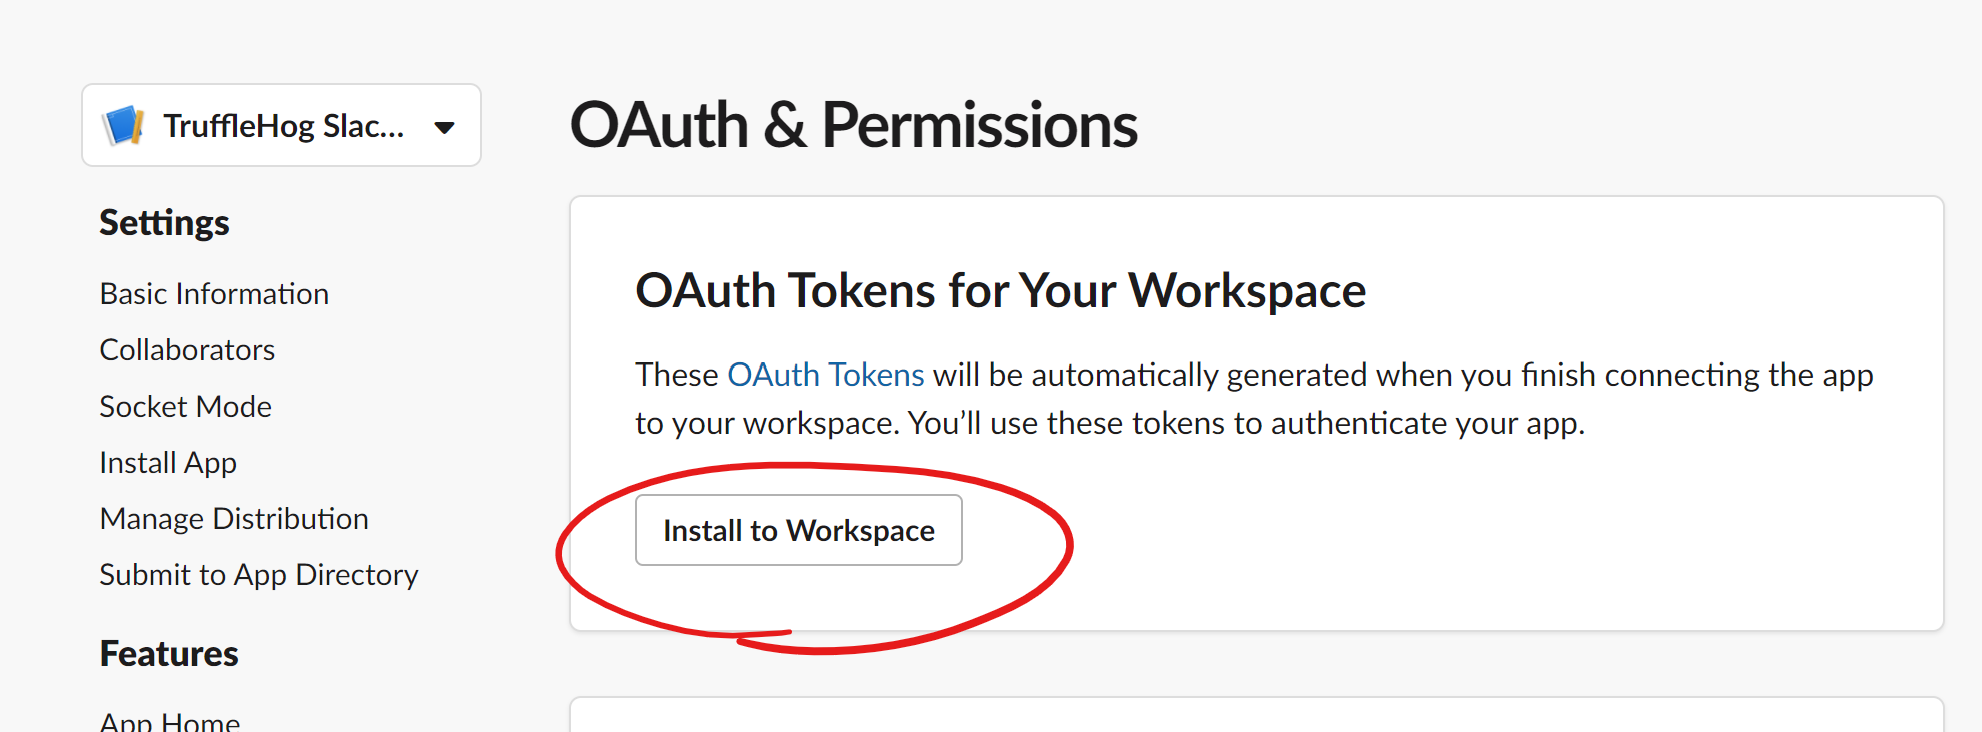
- If your user does not permissions to install the app it may send a request to your Slack admin asking for them to approve it. If so, it may be a good idea to give them a heads up before you do this :)
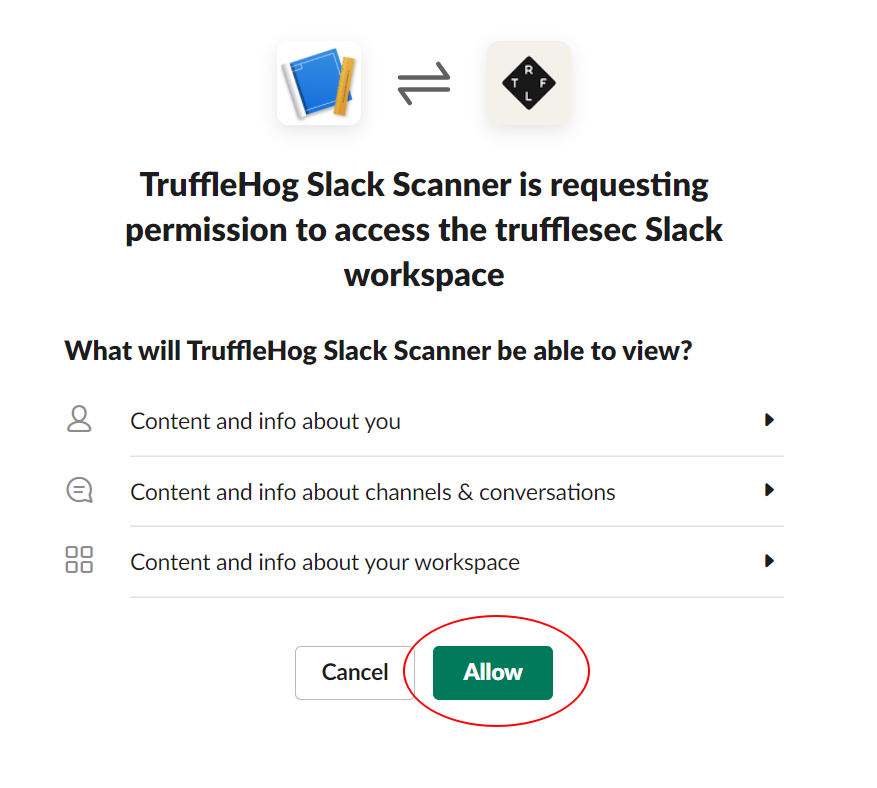
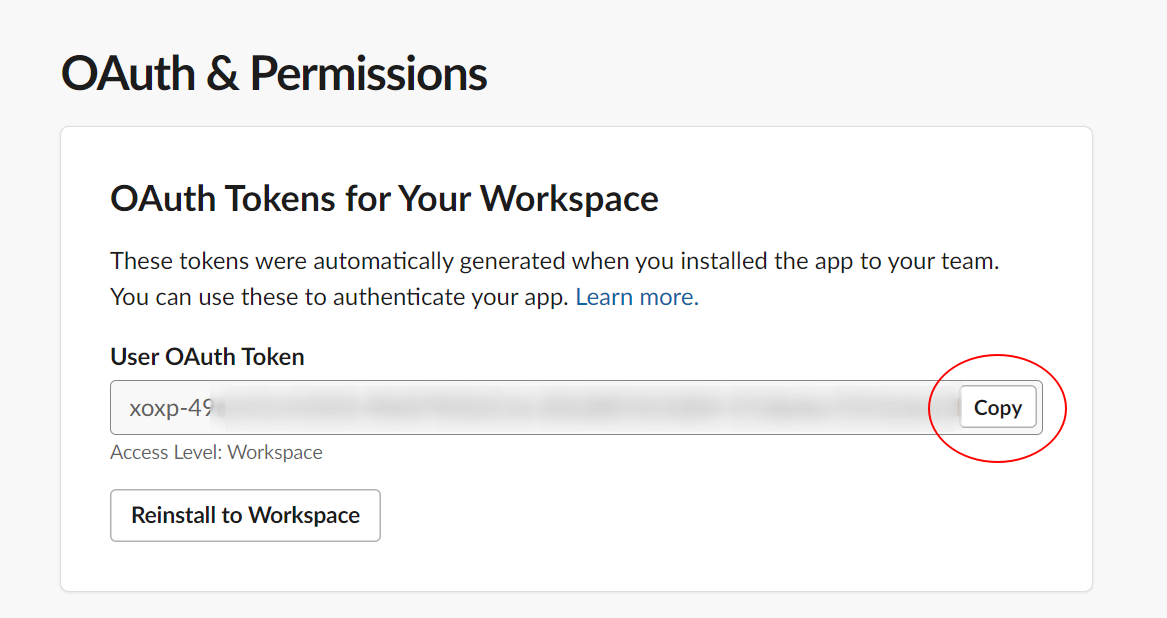
- Copy your newly minted token and paste it into the token field from the local configuration file above (TIP: Remove the channels line and values if you want trufflehog to scan all accessible channels.)
- Once you run your local scan, TruffleHog will pick up and scan the configured slack source!
S3
AWS Simple Storage Service (S3) is a cloud-based object storage service that TruffleHog integrates with as a source. In AWS, access to an S3 bucket can be controlled through various IAM (Identity and Access Management) identities. These include IAM users, which are individual entities with specific permissions; IAM roles, which are sets of permissions that can be assumed by any authorized entity, such as an AWS service or an external user, and instance profiles, which are special-purpose IAM roles that are assumed by EC2 instances. TruffleHog supports any of these identities for access, although each will require specific configuration within TruffleHog as well as your AWS account.
To successfully configure an S3 source, you need at minimum:
- An AWS account with at least one S3 bucket to be scanned.
- An IAM identity that has the correct access and authorization to list the bucket and download objects from it.
Starting with the basic example; local AWS credentials:
S3 with AWS IAM credentials
Configuration:
sources:
- connection:
    '@type': type.googleapis.com/sources.S3
    cloudEnvironment: {}
  name: S3
  scanPeriod: 12h
  type: SOURCE_TYPE_S3
  verify: true
If you omit providing buckets (as in this example), then all buckets that the credential can list and access will be scanned.
This configuration assumes that valid AWS credentials are available in one of the standard locations. This can be used with IAM users, roles, or instance-profiles.
Example IAM policy:
{
	"Version":"2012-10-17",
	"Statement":[
		{
			"Effect":"Allow",
			"Action":[
				"s3:GetBucketLocation",
				"s3:ListAllMyBuckets",
				"s3:ListBucket",
				"s3:GetObject"
			],
			"Resource":"*"
		}
	]
}
This is the basic IAM policy that needs to be attached to the IAM identity being used to access the S3 bucket. AWS also provides additional policy examples for more granular access control over S3.
S3 with static credentials
While this configuration can be useful for testing, we generally don’t recommend this in a production environment, as the credentials will be exposed in plaintext. This configuration is compatible with IAM users and static credentials.
sources:
- connection:
    '@type': type.googleapis.com/sources.S3
    accessKey:
      key: AKIAKEYID
      secret: XXXXXXXXXXXXXXXXXXXXXXXXXX
    buckets:
    - bucket-one
    - bucket-two
  name: S3
  scanPeriod: 12h
  type: SOURCE_TYPE_S3
  verify: true
S3 with AWS IAM Role Assumption
This is generally the most secure option, and can be used to enable a single scanner instance to scan multiple buckets across different AWS accounts.
A common implementation pattern is to have the TruffleHog scanner in an administrative/security account, with a permissions policy attached that only permits the IAM identity (user, role, or instance profile) to assume IAM roles in accounts that contain S3 buckets that are the desired scanning targets.

The IAM roles in those accounts should be assigned permissions policies similar to this example:
{
	"Version":"2012-10-17",
	"Statement":[
		{
			"Effect":"Allow",
			"Action":[
				"s3:GetBucketLocation",
				"s3:ListAllMyBuckets",
				"s3:ListBucket",
				"s3:GetObject"
			],
			"Resource":"*"
		}
	]
}
IAM roles can be assumed by an IAM entity, such as a user or role, that is an allowed principal in an IAM trust policy attached to the role.
Please refer to AWS documentation for additional information on IAM roles, usage scenarios, and configuration.
Example trust policy:
{
  "Version": "2012-10-17",
  "Statement": [
    {
      "Effect": "Allow",
      "Principal": {
	  "AWS": "arn:aws:iam::123456789012:user/Bob"
	},
      "Action": "sts:AssumeRole"
    }
  ]
}
The scanner should be configured as follows, with each role you intend to assume must be specified explicitly using its ARN value.
sources:
- connection:
    '@type': type.googleapis.com/sources.S3
    roles:
    - roleArn-1
    - roleArn-2
    sessionToken: {}
  name: S3
  scanPeriod: 12h
  type: SOURCE_TYPE_S3
  verify: true
Passing in a role ARN without specifying a bucket will result in all buckets that the role can list being scanned. Multiple roles can be specified as individual arguments.
If a bucket or buckets are supplied in addition to multiple roles, a scan will be attempted against each bucket by each role.
S3 with AWS IAM Role Assumption using an Instance Profile
Using an instance-profile to perform role assumption is similar to the configuration for IAM role assumption in the previous section. However, the scanner configuration is slightly different:
sources:
- connection:
    '@type': type.googleapis.com/sources.S3
    roles:
    - roleArn-1
    - roleArn-2
  name: S3
  scanPeriod: 12h
  type: SOURCE_TYPE_S3
  verify: true
Note that this configuration does not make use of the sessionToken field.